Wednesday, August 31, 2016
8 Time Management Tips to Help You Hit Your Long-Term Deadlines
While intended to make life easier, sometimes putting together a to-do list can feel like a bigger undertaking than accomplishing the actual tasks at hand. This concept is referred to as the procrastination "doom loop" -- a cycle of putting off tasks, feeling anxiety and guilt, and consequently working with lower productivity and efficiency due to these negative feelings.
This is especially true when it comes to long-term projects, as it can be easy to lose focus and diligence when working toward monthly or quarterly deadlines. But when you're forced to work as your own project manager, organization is the name of the game.
To help you stay on track and make consistent progress towards your goals, we've put together a list of tools that'll help you complete long-term projects on time without losing motivation or entering the "doom loop." Check them out below.
8 Time Management Tips to Help You Hit Your Long-Term Deadlines
1) Set short-term SMART goals to benchmark your success, and don’t be afraid to adjust them.
If your long-term goal is months away, and the final product is the completion of a large project, such as an ebook publication or new product launch, short-term benchmarks for success will keep you on track and help you stay motivated and productive throughout the process.
We recommend setting SMART goals, which stands for:
Specific
Ensure that your short-term goals are as specific as your final goal. For example, instead of “work on ebook every day for three months,” set a specific goal to complete a certain amount of pages each week. Specific goals are easier to track and report on and more difficult to de-prioritize.
Measurable
Trackable goals allow you to measure your progress toward your final goal and report on your successes and challenges. If your long-term goal is to launch a social media campaign, a measurable short-term goal would be “secure one press mention per week” in lieu of “spread campaign awareness.”
Attainable
According to Harvard Business Review, being challenged is motivating, but working towards goals that you can’t reach is not. Establish goals that you can work to achieve and not be discouraged by. For example, it may not be attainable for your branded hashtag to start #trending on Twitter. Instead, you could aim to get a thought leader in your space to tweet using your hashtag to generate awareness on social media.
Realistic
When you’re strategizing for a big project, plan for the unexpected in the same way that you plan for success. Don’t be dishonest with yourself or your team about your daily productivity potential or how long different processes could take working toward the final goal. With eight hours in a typical workday, make sure you’re not biting off more than you can chew.
Time-Bound
Set mini-deadlines for yourself throughout the project timeline to give you a rough outline of what metrics you should be hitting each week. This approach helps break up your larger project into more achievable sections to prioritize. Balance your deadlines to provide you with motivation and some urgency, but if the deadline is too high-pressure and unrealistic, your creativity and productivity could actually diminish, based on results from a Harvard Business School study.
The key to setting these shorter-term benchmarks is flexibility, according to psychologist Tamar Chansky. Throughout your process, ensure that you are checking to ensure that these smaller goals are staying SMART -- with emphasis on “realistic.”
If you’re falling behind on a deadline or a process is proving more challenging than anticipated, adjust your measures of success to stay on-track.
2) Create a reverse to-do list for your projects.
When working on a deadline that is a month or more away, my favorite strategy for project management is a reverse to-do list, which I create by starting with my final, long-term deadline, then working backwards by building in milestones to complete during the process.
Here's an example of how I might use this approach when planning for an ebook launch:
It’s important to keep updating the deadlines and timeframes as your project evolves to account for any delays or unanticipated challenges to keep yourself on track.
Another key for making this a successful tool is building buffer time into your mini-deadlines to account for those delays. Even if it doesn’t normally take you a full week to incorporate edits, building extra days into each mini-deadline will ensure that your final deadline isn’t delayed by obstacles earlier in the process.
These mini-deadlines help promote prioritization of important tasks and prevent burnout, according to Harvard Business Review.
3) Create accountability for yourself.
You may be responsible for keeping track of your progress toward achieving your goal, and holding yourself accountable to the timelines and benchmarks you've established will help you stay motivated and positive at work.
Personal accountability leads to increased feelings of workplace satisfaction, creativity, and innovation, and there are a few ways to promote that while working on your long-term project, including:
- Sharing progress toward goals with others. For some people, being vocal about your goals and progress can make a huge difference. For example, one study found that participants in weight-loss programs are more motivated and likely to succeed if they share progress photos on social media.
- Setting up a personal reward system for each benchmark you achieve on the path to project completion. Our brains are wired to be more productive the more we achieve goals and reward ourselves, so be sure to keep progress benchmarks short-term and realistic.
- Tracking your progress so you can visualize what portion of your project you've successfully completed. Measuring progress helps you to evaluate your weaknesses, celebrate your strengths, and see the bigger picture of how your project is unfolding.
- Being honest with yourself and your colleagues about your achievements. If you're transparent about what you are (or aren't) able to achieve in a given timeframe, your experience will inform future strategy for long-term projects. This may take the shape of an informal conversation or an official performance review; in any case, be positive, focus on your achievements, and maintaining a growth mindset about your weaknesses to continually identify ways to improve and continue to excel.
4) Use a responsive to-do list.
If you’re working on a deadline that’s months away, flexibility is a must. You’ll need to be able to multitask, re-prioritize, and press pause on one piece of your project to focus on another depending on your organization’s needs. Responsive to-do lists and organizational tools are helpful ways to keep track of the various elements of a long-term project and to track daily, weekly, and monthly priorities all in one place. Check out tools that allow you to customize different types of lists, such as:
- Asana allows teams to create collaborative to-do lists and project management lists (Free for up to 15 users; Premium available for $8.33/member/month)
- Trello allows users to customize the names of their to-do lists, share them among their team members, and assign them to different people using due dates (Free for Basic; $9.99/user/month for Business Class; $20.83/user/year for Enterprise)
- todoist allows users to share unlimited tasks with colleagues and edit to-do lists offline (Free for Basic; $29/year for Premium)
- Google Keep is a digital sticky-note system that syncs to Google Drive (Free)
5) Create a schedule where you can be most productive.
Adam Rogers suggests finding your “biological prime time,” as coined by Sam Carpenter, author of Work the System, as key to becoming a more productive writer. This time can vary from person to person, but according to the Harvard Business Review, many traditional work schedules go against our natural circadian sleep rhythms that determine our peak and low energy levels.
Researcher Christopher Barnes learned that workers typically approach peak productivity around 12 p.m. and experience a sharp decline at roughly 3 p.m.. Towards the end of the afternoon, energy starts to return again, with another peak around 6 p.m..
The lesson here? Plan your most important tasks around these energy peaks, and your least important tasks around these lows. Barnes notes that this is not typical of many workers, who spend their mornings responding to emails and completing other administrative tasks, but who don’t start tackling bigger challenges requiring high levels of productivity until they have already missed their 12 p.m. peak and begun approaching the 3 p.m. slump.
Try to create a daily schedule that allows you to get the most out of your high-energy times, and if it operates contrary to the rest of your organization, communicate that with your supervisor.
In the example calendar below, events requiring higher levels of productivity and cognitive thought, such as meetings, presentations, and writing, are scheduled around peak productivity times. In contrast, answering emails and eating lunch are scheduled near productivity dips because, unless the emails are time-sensitive, these to-dos aren't typically top-priority and can be scheduled around bigger tasks.
This isn't an exact science, so finding your ideal schedule may require some testing to determine when you're most efficient and when you hit that afternoon slump.
6) Ask for help when you need it.
This is necessary advice for anyone working on a team, as using resources around you is integral to most workplace success, according to Fortune. If you’re being tripped up by an obstacle, are experiencing a production delay, or simply have writer’s block that could throw a wrench in your timeline, and you should use resources around you for guidance and assistance.
This is particularly essential if your deadlines are for finished products months in advance. Missing one internal mini-deadline probably won’t be an insurmountable issue, but if you’re consistently falling behind on benchmarks towards the final goal, staying silent and trying to fix the problem yourself could result in a missed deadline.
Don’t be afraid to reach out to peers or managers for help with brainstorming, editing, or any other roadblock you might be encountering. They would rather you reached out for help before missing a deadline than after missing a deadline, and remember: the most successful people ask for help.
Lean on resources around you to make your life easier and your project better, but remember to be a good coworker, too. When you're asking for help:
- Outline your SMART goals so your colleagues understand your project.
- Provide them with resources, such as project specs or prior drafts, to make it easier to help you.
- Be specific about what you're asking for and when your deadlines are.
- Say thank you! Acknowledge their above-and-beyond efforts by letting their supervisor know how they collaborated with you and offering to return the favor with one of their projects.
- Offer help to colleagues on a regular basis, not just when you need help, to cultivate good faith in your workplace so you're a person people want to help again in the future.
7) Commit to work-life balance.
When your project requires months of hard work, it might feel difficult to step away from your desk or computer at the end of each day with so much left to complete. However, you shouldn’t give in to the temptation of workaholism.
According to the Organization for Economic Cooperation and Development, working long (more than 50) hours can negatively impact your levels of productivity, innovation, and efficiency.
Even if you can’t turn in your final product right away, you shouldn’t stay at work burning the midnight oil trying to get it done early. You’ll work more efficiently by setting daily priorities that allow you to step away from work and recharge once you’ve completed them.
8) Analyze and report on successes and challenges of projects for future goal-setting.
Once you’ve successfully completed a long-term project, don’t move on to the next one without first reflecting on your strategies for project management. What went well, and perhaps more importantly, what didn’t?
If your work is primarily comprised of long-term projects, you will need to continually refine and improve your approach to be as efficient as possible. Document your processes and share them with your team so they can learn from your triumphs and struggles for their projects as well.
Just because your deadline is months away doesn’t mean that you shouldn’t start planning and strategizing for it today. Once you’re ready to dive into a project, learn more about strategies for successful, and not overwhelming, priority-setting and project management.
What are your tips and tricks for project management strategies? Share with us in the comments below!
via HubSpot Marketing Blog http://bitly.com/2bFLuHR
What Do Agency Employees Really Want? [Survey]
Employees are the lifeblood of the agency business, and maintaining a productive and engaged workforce is one of the most challenging aspects of running an agency. But it can be hard for owners to understand the attitudes and goals of an increasingly diverse workforce, and employees may find it difficult to give honest feedback anonymously.
To find out how the attitudes of agency employees shape their goals and opinions about agency work, HubSpot is partnering in a new Agency Employee Attitudes Survey.
The survey is anonymous, and should take less than 15 minutes to complete. Respondents who participate by September 15th can enter to win a $250 Amazon.com gift card.
TAKE THE AGENCY EMPLOYEE SURVEY
The results of this study will be presented at INBOUND 2016 in November.
The Agency Employee Attitudes Survey explores topics such as:
- How do agency employees view the importance of work, play, and balancing the two?
- What expectations do they have from their agency employers, and how do they view their own responsibilities?
- How do they compare the pros and cons of working in an agency versus in a client-side organization?
- How did they first choose to work in an agency, and how likely would they be to recommend an agency career to others?
- Which features and benefits of an agency career are most important to them?
- Do millennial employees actually feel differently about work than other age groups?
- How can agency owners better understand their employees and offer them features and benefits they will value?
All participants can get free access to the results, which will be shared for the first time at HubSpot’s INBOUND Conference in November 2016.
via HubSpot Marketing Blog http://bitly.com/2bAnFXJ
Tuesday, August 30, 2016
How to Live Stream Successfully: A Preparation Checklist for Marketers
Raise your hand if you’d rather watch a video to learn something new than read about it.
Go ahead -- you’re not alone. 59% of executives say they’d rather watch a video than read text, too. And really, that number makes sense -- we are a society of video streamers. (I mean, hello, Netflix.)
That’s great for entertainment value, but what about business? Well, it turns out that video -- especially the live streaming kind -- has a serious positive impact on the brands that use it. According to Tubular Insights, 73% of B2B marketing professionals say that using video has shown a positive ROI.
But if you’re not sure where to begin, fear not -- we’re here to make sure you don’t just hit the “Live” button on Facebook and stare at the camera like a deer in headlights. Instead, we’ve come up with a comprehensive checklist to help you plan your first -- or next -- live stream.
How Live Streaming Works
Live streaming is a way to broadcast your events to an online audience. It’s a digital alternative to something like selling tickets to an in-person event, and allows you to reach people near and far with live video.
Brands use live streaming for a few different reasons, but according to a Brandlive survey, 71% of businesses use it to more authentically interact with an audience. So instead of being the proverbial “man behind the curtain,” you’re allowing viewers to put a face (or faces) to your organization's name, all in real time.
Live streaming can be used for a number of different event types, as well. Everyone from the White House, to fashion houses, to chefs have live streamed videos of economy briefings, runway shows, and cooking demos, respectively. Here at HubSpot, we’ve used it for things like interviews with thought leaders. So feel free to be creative -- just make sure you’ve got your bases covered.
How to Live Stream Successfully: A Preparation Checklist for Marketers
1) Plan your live stream like you would any other event.
Think about some of the most popular talk shows. Can you imagine if the guests, sets, lighting and schedules for something like “The Tonight Show” weren’t planned in advance? To say the least, it might be chaotic.
You’ll want to put the same thought and due diligence into your live stream that you’d put into an in-person event of its kind. And you’ll want to have your goals in mind as you begin to make those plans; those will dictate a lot of the logistics.
Who
Knowing your target audience will determine a few pieces of the planning process. If it includes an international population, that should factor into the date and time of your stream -- be sure to think about time zones or holidays that might not be top-of-mind in your home country.
What
Then, think of what category your live stream falls into, and create a title for your event. In case you don’t find any of the above examples fitting to your business, we’ve got some ideas for ways businesses can use live videos.
HubSpot’s Social Media Marketing Manager, Chelsea Hunersen, stresses the importance of thoroughly researching the topic of your live stream in advance.
“Decide important points or stats to hit,” she says. And if you’re going to feature guests, “designate a moderator/host who can make sure these points are hit and can wrap up the conversation if necessary.”
Where
The platform you use -- which we’ll get to in a bit -- can also be dependent on who you want to view the stream. Different audiences use different channels, so you’ll want to pick the one that’s most likely to draw the crowd you want.
Finally, pick an optimal location from which you’ll broadcast your stream. A poor quality video can make someone 62% more likely to have a negative perception of the brand that produced it -- so make sure your setting is conducive to a positive viewing experience. Does it have good lighting? Is it prone to a lot of noise? Is there a chance that your dog walker will barge in yelling, “Who’s a good boy?” loud enough for the entire audience to hear? (Not that that’s happened to me.)
Think of these contingencies, then pick a streaming venue that insulates you from them.
2) Choose your platform.
Here’s where you’ll really need to have your goals in mind, since different platforms can achieve different things.
YouTube Live
YouTube Live Events tend to have “two goals,” says Megan Conley, HubSpot’s Content Marketing Strategist. “Registrants and attendees.”
So, if you’re looking to generate leads -- which 57% of marketing professionals are using video to do -- YouTube Live is one of the best platforms to use.
Here’s how that works. First, if you don’t have one already, you’ll need to create an account on Google, which you’ll then use to create one on YouTube.
Once that’s done, you can use YouTube’s Live Streaming Events dashboard to schedule a future stream -- just click on “Enable live streaming,” if you haven’t already set it up.
Then, click “schedule a new event.”
You’ll need to indicate if you want your event to be public or private -- here’s where you’ll decide how you want to use your live stream to generate leads.
In the image above, I’ve selected “unlisted.” That option accomplishes two things:
- I’ll be able to generate a link that attendees will get only after they fill out a registration form.
- It won’t stream directly onto my YouTube page.
You also have the option of choosing which type of live stream you want to use:
- Quick
- Custom
Custom is a better option if you want to get more advanced and have more control over the technology. It lets you use more than one camera, choose your own ingestion bitrate and resolution, and use your own preferred encoding equipment (there’s a pretty good breakdown of your options here).
We’ll talk more about encoding later, but for the purposes of this blog, we’ll be working with the quick option. Quick uses the Google Hangouts On Air technology, which is probably better if you don’t want to get too technically advanced. It lets you use your computer’s camera and microphone, though you do have the option of using an external camera, if you want.
Once you’ve added some tags that describe what your event is about, click “Create Event.”
You’ll be taken to your events page -- any live streams that you’ve scheduled will be listed here. It’s also where you’ll get that link to keep behind the form on your landing page. First, click on the title of the stream.
The image above shows your Watch Page, which is the place where your stream will broadcast. Click “share,” and that will generate your event’s URL -- as I mentioned above, you can keep that behind a landing page where attendees fill out a form to register.
Conley says that, generally, this type of live stream is embedded on a thank-you page behind a landing page form. But with this platform, that’s a little trickier -- YouTube doesn’t generate embed codes for live streams unless you have an approved AdSense account linked to your YouTube account.
But fear not -- if you use the HubSpot COS, all you’ll need is the link, and the system will generate the embed code for you.
Just click “insert media,” paste the link you copied from the Watch Page, and you’re done.
If embedding isn’t an option, you can still just put a link there -- the embed code just creates a seamless design that you can place right on your thank-you page. Either way, be sure to use the thank-you page as a place to remind your attendees of the date and time of the event.
There’s also the option to make your YouTube Live Event completely open to the public. That’s a good option, Conley says, for a major event that you “want anyone and everyone to be able to find.” But if you make your stream public, she points out, make sure you use the event to promote gated content you want your audience to download.
“An image CTA would do,” she notes, as would holding up clearly-printed short links throughout the stream. (Make sure you have those printed out in advance!) In the image above, you’ll also see that you can add a message to your video -- you can mention your gated content there, too.
Facebook Live has been making quite a few headlines lately, and businesses stand to benefit from it -- the average time spent watching Facebook Live video is three times more than the pre-recorded kind.
This platform is a good choice if you want to use your live stream to generate buzz. In fact, because these videos have been so popular, Facebook is making them appear higher up in people’s News Feeds while streaming live.
Even without pre-registration, you can definitely promote streams on this platform in advance, which we’ll touch on later. In the meantime, if you haven’t used it before, check out my colleague Lindsay Kolowich’s overview of Facebook Live.
The live streaming options certainly don’t end there -- major brands have also used platforms like Periscope, Livestream, and Ustream. They all have their own sets of features and advantages, so definitely take the time to look into which one best suits your needs.
3) Choose your equipment.
When it comes to the actual hardware required for your live stream, some of it is fairly intuitive: A camera is pretty standard, for example, or a device with one installed (like a laptop or phone).
But if you do use your phone, Conley says, be sure to use a tripod. “There’s nothing worse than recording a Facebook Live and having your arm start to fall asleep five minutes into the recording,” she advises. “Use a phone tripod to give your live streaming a professional look.”
Consider how professional you want your sound quality to be, too. Your camera might have its own microphone, but if your setting is more prone to noise, body mics might not be a bad idea, either.
And when you’re using an external camera, says Hunersen, you’ll also need some sort of encoding software (Facebook has a great step-by-step guide to that). That’s what converts the camera footage into a format that your streaming platform understands and can broadcast to viewers. The software you use might depend on your budget, but to get started, check out this one from Adobe.
Also, think about setting up a professional backdrop, like one with your logo. That can help to brand your videos and give them some visual consistency, which is a particularly good practice if you plan to do a lot of live streaming in the future.
Want to take that a step further? “Set up a makeshift studio in your office to speed up the prep time for all of your future recordings,” Conley says. “A beautiful, branded backdrop could be just what your Facebook Live needs to help grab the attention of someone quickly scrolling through their News Feed.”
4) Promote your live stream.
Congratulations! You’ve now completed a lot of the major planning and setup for your live stream. Now, how do you get people to watch it?
As we’ve covered, using a landing page is a good way to get enrollment on a platform like Hangouts On Air (or, as of September 12th, YouTube Live). Here’s an example of how we recently used one at HubSpot:
There’s a clear CTA here -- “View The Video” -- which, when clicked, takes the visitor to a registration form. (And check out this rundown of which channels drive the best conversion rates -- it’s got some tips on getting people to your landing page in the first place.)
Once someone fills out the form on your landing page, it should lead them to a thank-you page, where you can share some promotional information about the live stream.
HubSpot’s Co-Marketing Demand Generation Manager, Christine White, suggests creating a “Next Steps” section here with actionable items like "add this event to your calendar” and "check back here on [the date of your event],” to remind viewers that’s where they’ll go to view the live stream.
And once you have contact information for your registrants, Conley reminds us, “you can email the people on that list on the day of, and remind them when it’s going to go live.”
But to promote your Facebook Live stream, says Conley, “It’s really about doing a social image and spreading the word that you are going live at a specific time.”
Don’t rule out using social media to promote live streams on other platforms, too. Some of them, like YouTube, allow you to link your social accounts and push content in multiple places. And if your guests are active on social media, leverage that -- include links to their handles in any related content, and ask them to promote the event with their own networks.
5) Do a dry run.
There’s a reason why we do dress rehearsals. When I was in a high school show choir -- a humiliating but factual piece of history -- it was to make sure I didn’t trip over my dance partner in high-heeled tap shoes.
In the world of live streaming, though, we do dry runs to avoid more technical, but equally embarrassing missteps. Improv can be hilarious, but not when it means you’re verbally unprepared, or your equipment stops working and you don’t have a backup plan.
6) Prep any guest speakers.
Is there anything worse than a moment of awkward, dumbfounded silence?
As part of your dry run, make sure your guests are prepared for any questions they might be asked. Don’t over-rehearse, but do what you can to prevent catching them off-guard.
“It may help to give some questions in advance to a potential guest,” says Hunersen, “but save some follow-up or in depth questions for on-air, so that you're able to let them be both prepared and react in the moment.”
7) Test your audio and internet connection.
You might want people to talk about your live stream, but not if all they’re going to say is, “We can’t hear you.” Make sure all of your audio equipment is working -- both during your dry run and on the day of the stream. Having an extra microphone and batteries on hand probably won’t hurt, either.
Make sure your network can handle a live stream, too. If you’re streaming high quality video, for example, you’ll need both a wire connection and a 3G/4G wireless connection, according to Cleeng.
In other words, make sure your WiFi is working, but also, “grab an ethernet cord,” says Conley. “One thing you can’t help is if your internet connection unexpectedly goes out.”
We know -- even the sound of “ethernet” seems terribly old school. But if your WiFi suddenly drops, you’ll be glad you busted that cord out of storage.
8) Set up social media monitoring.
One great thing about live streaming is your audience’s ability to join the conversation and comment in real time. But try watching any Facebook Live feed, and you’ll see that the comments roll in fast. So while it’s awesome to invite and answer viewer questions -- especially if you personalize your responses -- it can be overwhelming.
That’s why it’s a great idea to dedicate someone to monitoring social media, comments, and questions during the live feed.
That task can made a bit easier with something like a branded hashtag created specifically for this live stream. For platforms with built-in comment feeds, for example, you can ask your viewers to preface any questions with it -- that can help qualify what needs to be answered.
You could even take that a step further and use the hashtag throughout the planning process, making sure to include it on your landing page, thank-you page, and promotional messages leading up to the event. That helps to create buzz around the live stream. And if you use HubSpot's Social Inbox, here’s a great place to take advantage of its monitoring feature, which lets you prioritize and reply to social messages based on things like keywords or hashtags.
After Your Live Stream
It’s always nice to follow up with your attendees after your live stream has ended. Thank them for their time, give them a head’s up about your next event, and invite them to download a piece of relevant content. If you’ve followed these steps, you’ve probably done a great job of using your live stream to generate leads -- so keep up the momentum and nurture them.
Have you experimented with live streaming? What have you learned? Share your tips in the comments below.
via HubSpot Marketing Blog http://bitly.com/2bSRnUC
Email Marketing for Schools [New Ebook]
Choosing a school is a big decision that's grounded in education and research.
Controlling this discovery process that drives someone to select your school is no easy task. There's a wealth of information available on the internet, not to mention the mass of communications that prospective students and parents receive daily.
Email has been a game-changer in the admissions process, helping schools to further inform prospects by placing helpful information right in front of their eyes. That said, the amount of email being sent is on the rise, and it takes some serious skill to really wow readers nowadays.
So, how do you create an effective email marketing plan that boosts enrollment for your school?
We're excited to share a new complimentary ebook, Email Marketing For Schools, designed to help you exceed your admissions and enrollment goals. In it we'll share:
- How to grow your email list (the right way)
- Tips for segmenting your database of prospective students and parents
- A breakdown of which emails you should send throughout the enrollment journey
- Email design and copy best-practices
- An interactive checklist to ensure each and every send is your best one yet
- Examples of emails we love from both independent and higher education schools
- And more!
You can download your copy of Email Marketing for Schools here >>
Like what you read? Let us know in the comments or feel free to share on Twitter.
via HubSpot Marketing Blog http://bitly.com/2co9rt6
How to Get Caught Up on Email After Vacation: 9 Helpful Tips
There's nothing that squashes vacation bliss quite like coming home to a crazy inbox.
One minute, you're reminiscing about the stunning sunset you caught on your last night. The next, you're scrolling through an overwhelming number of unread emails, desperately trying to discern which ones you actually need to read and wondering why on earth you thought it was okay to take vacation in the first place.
But taking quality time away from the office -- and away from work email -- is actually good for you. It's good for your physical health, your mental health, and your productivity and creativity when you actually get back to work.
In fact, a study from the University of California, Irvine found that the very act of checking email increases our heart rate and stress level -- and that spending just five days email-free makes us objectively calmer.
The key to recovering a healthy inbox quickly comes down to planning your time and organizing smartly. Read on for nine tips for cleaning up your inbox after vacation.
How to Get Caught Up on Email After Vacation: 9 Helpful Tips
1) Set up a filtering system before you even leave.
While most of the tips on this list are about how to deal with your email after vacation, there are things you can do to set yourself up for success before you leave that can make a big difference. My favorite? HubSpot's Director of Marketing Rebecca Corliss' awesome email filtering system on Gmail that she sets up before every vacation, which you can read about in detail here.
Here's the short version: Before she leaves for vacation, Corliss creates a whole bunch of filters that sort her incoming emails into specific folders as they come in. For example, one filter puts all of the emails sent by her immediate team members into a single folder so she can find and read those first. She also has filters that delete automated emails she doesn't need to read, like daily traffic and leads dashboards.
The result? She's effectively ensured that when she gets back from vacation, her immediate inbox will be at or near zero.
2) Set expectations with an out-of-office auto-reply message.
If you don't already set up out-of-office auto-replies when you go on vacation, you should start now. Whenever someone sends you an email when you're out of town, they'll receive an automated email you've written that lets them know you're out of the office and won't be checking email until a certain date.
Your message could be as simple as:
Hey there,
Sorry I missed your email. I'm currently [traveling/celebrating my friend's wedding/hiking in the Alps] and won't be checking email until [date]. If it's urgent, please reach out to [name] at [email]. Until then, why not check out [link to piece of interesting company content]?
Thank you!
If you want to really set expectations for the people while also making your life easier when you return, then I recommend adding a short paragraph similar to the one below, which I borrowed from my colleague Sam Mallikarjunan:
If you want to make sure your message gets a response ASAP when I return, please send it again on [date]. I recommend using this free email scheduling tool to schedule it now, while you're thinking about it.
Not only does this help set expectations, but it'll mean the most important emails will be at the top of your inbox when you get back.
If you're looking for different wording, here are a few other auto-reply templates to try.
Pro Tip: Leave your auto-reply message on for an extra day while you're catching up on email. It'll help prevent an influx of requests the day you get back, while also keeping people's expectations of a response to a minimum while you're working through everything.
3) Block 2–3 hours for going through your inbox on your first morning back.
This is something you should book on your calendar before you leave for vacation. Go into your online calendar and block off at least two or three hours on the morning of the first day you're back at work. Since mornings tend to lend fewer distractions, it'll be easier for you to crank through your emails without multitasking, which can really hurt your productivity. (See #4 for more on how to stay distraction-free.)
I usually name that block of time something like "Hold for catch-up" so people know not to book me.
4) Use the Pomodoro technique to get through emails faster.
When it finally comes time to clean your inbox post-vacation, the best way to stay productive is to hone in on those emails -- and only those emails. But you have to be realistic about how long you can concentrate at any given time before you start getting distracted. That's where a time management technique like the Pomodoro technique can come in handy.
The Pomodoro technique is one of my favorite time management techniques. It's based on periods of distraction-free work followed by short breaks. To easily monitor time, I recommend using desktop timers like Pomodoro One for Mac or Tomighty for Windows. To use the technique, it's as easy as pressing "start" and "stop."
Pro Tip: To get the most out of your distraction-free work, turn your cell phone on silent and remove email and social media notifications and other distractions from your computer and work atmosphere.
5) Organize your emails into folders.
Creating folders (or labels, if you use Gmail) within your inbox can help you categorize the various types of emails you receive on a daily basis so that you can more easily sort and see who is emailing you and what it is about. Having a place to put archived emails will make you much more likely to actually archive them, and having a system in place will help you get through an overwhelming inbox a lot quicker.
If you use Gmail, I highly recommend Andrea's Klinger's "inbox zero" methodology, which I live by when it comes to maintaining a healthy inbox. The methodology uses two built-in features in Gmail: "special stars" (a slightly fancier labeling system than Gmail labels) and multiple inboxes.
Here's what your inbox will look like once you get through them all:
Don't be intimidated by the unfamiliar set-up -- it's actually quite easy to do. Since publishing this step-by-step guide to his methodology last year, many people have told me it's changed the way they use email -- and has made their lives a lot easier.
If you don't use Gmail or you'd rather stick to a more classic labeling system, take the time to actually think about the emails you receive and how you might sort and categorize them efficiently. Focus on creating folders based around the various roles you take on at your job, the automated emails you receive, and the people you work with. For example, you might have a folder dedicated to all the email exchanges you have with your direct reports.
6) Delete and archive ruthlessly.
Some people hoard household items -- clothing you haven't worn in years, for instance. You know you probably aren't going to wear it, but you keep it anyway on the off-chance someone throws an '80s-themed party.
It's the same way with emails. A lot of people have a strange attachment to emails solely because they're afraid to "let them go" -- i.e., move them to a folder, archive them, or (gasp!) delete them. (That's why it pays to have some sort of system for organizing your emails. See #5.)
But when you get back from vacation, you're probably facing hundreds, maybe thousands of new emails in your inbox. The hardest part is figuring out which ones of those are actually important, and which ones you really don't need to respond to -- and can either archive or delete. Ruthlessly. Trust me, once you get started, it'll actually feel good.
Pro Tip: If you have a little more time, you may want to unsubscribe as you delete automated emails. After all, the easiest way to have a cleaner inbox after time away is simply ... to get less email in the first place. Use a free tool like Unroll.Me to mass unsubscribe from every single newsletter that doesn't provide you with value on a regular basis. (In fact, my recommendation is to unsubscribe from everything. Take a few days to let it sink in, and then re-subscribe only to the newsletters you really, truly miss.)
7) Don't try to respond to everything.
As tempting as it might be to be the most selfless, helpful, and perfect version of yourself 100% of the time, it's important for your inbox (not to mention your sanity) to think of email messages not as precious, but as perishable, as Merlin Mann once put it. As "[p]erishable, time-stamped milk that becomes a little less fresh every day until it smells kind of funny and just needs to be dumped."
There's simply no way you'll be able to respond to every single email that arrives in your inbox -- let alone even read them all. This is especially true when you come back from a vacation and are dealing with hundreds of unread emails.
So archive emails. Delete them. Whatever you do, don't respond to every single one.
8) Reply faster using canned emails and templates.
For some of the emails that do require a response, you might be able to make the process of responding more efficient. For example, do you ever find yourself typing out very similar email responses to different people over and over again? This happens to me a lot -- like when people ask me how to submit a guest post to the Marketing Blog. I used to manually type out my responses to these emails, which required finding and copying the link to our guest blogging guidelines page, crafting a few sentences, and so on.
Then, I discovered "canned responses," a features in Gmail, Outlook, and several other email clients, which has probably saved me hours of time copying-and-pasting over the course of a few years. Here's how to set that up in Gmail and Outlook.
To Set Up Canned Responses in Gmail:
- Click the gear icon in the upper right-hand corner and choose "Settings."
- Click the "Labs" tab, find Canned Responses at the top, and click "Enable." Scroll down and click "Save Changes."
To create a canned response, compose a new email and click the little arrow in the bottom right-hand corner of the new email. Choose "Canned responses," and then "New canned response." From there, you can name your new canned response, write it, and save it. Anytime you want to use it, simply go back to that little arrow, choose "Canned responses," and click on the one you'd like to use. (Learn more on Google's website.)
To Set Up Canned Responses in Outlook:
In Outlook, the best option I could find was to set up your canned responses as "Signatures." That way, when you reply to an email, you can choose the appropriate "signature" and the whole canned reply will appear. Here's how to do that:
- On the Outlook menu, click "Preferences." Under "E-mail," click "Signatures."
- Click the plus icon to add a new signature.
- A new signature will appear under "Signature name" with the label "Untitled." Double-click "Untitled," and then type in a new name for your canned response.
- In the right pane, type the text that you want to include in the signature -- in other words, type in your canned response.
Once you create the canned response as a signature, you can add it to a new email by clicking in the message body, choosing the "Message" tab, clicking "Signatures," and choosing a signature from the list. (Learn more on Outlook's support page.)
Or, if you use HubSpot CRM, you can use the built-in email templates to easily send personalized emails right from your email tool.

9) Use Boomerang to resurface emails when you need them.
As for those emails that will need a response eventually, but just not right now ... When you're dealing with a full inbox, it can be easy to forget about them entirely. (Or, worse, accidentally get rid of them.) That's where a free tool like Boomerang for Gmail can be really, really helpful.
Boomerang lets you archive an email, but choose the exact date and time you want it to re-emerge in your inbox -- as an unread message. In other words, it removes messages from your inbox until you actually need them. All you have to do is click the "Boomerang" button when you have an email open and choose when you need it again. It'll archive your email until the time you choose.
(Read this blog post for a list of 14 email organization tools including Boomerang that'll help you keep a clean inbox.)
Remember: A full inbox is inevitable after you take some time off. You don't have to let it overwhelm you; you just have plan for it. Set up that out-of-office auto-reply message, create filters to organize your incoming messages more clearly, and block off time on your first day back to clean your inbox. When it comes time to dig in to all those unread emails, trust your instincts and be ruthless about archiving and deleting.
Until then, relax and enjoy that well-deserved vacation.
How do you recover from your post-vacation inbox? Share your tips with us in the comments.
via HubSpot Marketing Blog http://bitly.com/2byux6D
How Agencies Price Their Services, In 4 Charts
There's a standard market price for milk, speed boats, and even birthday clowns, but the going rate for agency services is a little more of a gray area.
This lack of clear guidance has led every agency leader to ask themselves at some point during their company's growth: How the heck should I price my services?
HubSpot Research recently conducted a survey of 782 agencies to get a better picture of how they set prices for their offerings. The Agency Pricing & Financials Report offers new benchmark data to help agencies understand how their peers are creating and evaluating price structures, acquiring new business, and selling services.
To enable you to make more informed and scalable decisions about your own pricing model at every stage of growth, we've pulled out four charts from the research that best explain how agencies are approaching their prices.
You can take a look at the full report here, or read on to check out the pricing charts.
How Agencies Price Their Services
1) The CEO is the key decision maker for setting prices, but other departments can offer valuable insight.
When it comes to setting service prices, the agency CEO is most likely to be the one calling the shots. 89% of survey participants said that their CEO was the biggest decision maker for pricing. However, business development and client services departments are steadily increasing their influence. And they have a lot to offer.
These departments (or individuals depending on the size of your agency) have more direct contact with prospects and clients than anyone else in the business. They're tuned in to the clients' expectations and needs, and probably have a good idea of what customers are willing to pay to get problems solved. They likely also have some valuable insights into your agency's biggest competition and what they're charging.
Even if you work at a small shop where the CEO takes charge of every infrastructure decision, it will pay off to include business development and client services in pricing discussions.
2) Most agencies rely on a retainer or fixed fee pricing model, but they should always be willing to reevaluate.
Retainer-based pricing models can offer agencies increased security by ensuring they're paid up front for their hefty investment of time and manpower. Keeping clients on retainers also alleviates some of the stress and desperation associated with constantly seeking new business opportunities, since you already have a steady and reliable source of income. With these clear benefits, it's not surprising that the majority of survey participants identified retainers as the most commonly used pricing model.
In order to avoid messy reevaluations and potential scope creep down the line, it's vital that agencies clearly and firmly define the project's scope at the outset. This way, there are clear expectations on both sides about the project's timeline, budget, what the work entails.
In the event that a project does evolve or grow to the point where the agency is in danger of over-servicing, there should be a process in place to re-negotiate terms with the client.
So is there a one perfect pricing model? Not quite. Despite the popularity of the retainer and fixed fee models, agencies should fully explore their pricing model options and figure out what works best for them and their clients.
3) Agencies that want to increase their retainer pricing should consider shifting towards a value-based retainer model.
Of the agencies surveyed that use a retainer-based pricing model, the average retainer price varied, with most agencies falling in the $2,500 to $5,000 range. Retainer prices are traditionally based on a client's overall budget, the anticipated scope of services you'll be performing, and how many hours you're planning to devote to the client.
While these factors are important to consider when devising the initial estimate, agencies looking to increase their retainer prices should consider transitioning to more a value-based retainer pricing model.
Instead of selling your services as: "You pay us X and we give you Y and Z," try to shift the expectation to "You pay X for the ability to work with us for a month." This will increase the perceived value of your services and give you the necessary flexibility to focus entirely on bringing the client results.
4) Agencies with a performance-based pricing model should consider using more diverse metrics to measure value.
According to the report, only 8% of agencies consider their pricing model to be completely performance or value based. So what does a value-based model technically entail? It prices an agency's services based on the measurable value the agency ends up delivering to the client. How that value is measured is usually agreed upon in advance with the client.
Of the agencies surveyed, those using a completely value-based model said leads is the metric most often used to evaluate their performance. But is counting leads alone really the best way to measure the success of a project or campaign?
Probably not. While leads are an easily measured KPI, they don't always represent the complete picture of success. Think about it: If a campaign brings in 1,000 new leads, but none of those leads are actually qualified, did the campaign really provide value?
Agencies relying on a performance-based pricing system should sit down with individual clients and decide what's really important to them, and devise a pricing system based on their unique KPIs.
via HubSpot Marketing Blog http://bitly.com/2bOqGBj
Monday, August 29, 2016
8 Data-Backed Strategies to Increase Your Video's Play and Conversion Rates

Video production is not just about making videos for awareness purposes. In our experience, using video strategically can help you at every step of the marketing funnel from lead generation to revenue growth.
In order to reach these goals, savvy marketing teams want to make videos that drive conversions. Whether you're hoping someone will find your website organically, sign up for a product demo, or even purchase your product -- a well strategized video can help boost your conversion rate.
A video that converts needs to be clear in its goal. What do you want this video to accomplish? What should be the next step that your viewer takes in their journey after watching your video? You want that next step to be as clear as possible, making conversion a seamless experience for your audience.
Identifying and Leveraging Conversion Opportunities
Increasing Your Video's Play Rate to Boost Conversion
With just a few simple tweaks, you can dramatically boost your videos' play rates. Small changes can make all the difference for someone watching your video -- whether it be a product video or a webinar.
1) Make the Thumbnail Friendly
The video thumbnail is the first thing your audience sees when they look at your video. Think of it as your video's CEO. It represents your video to your audience, just like a CEO represents her company to the world. When putting up a video, many companies use the generic thumbnail image -- usually a frame somewhere in the middle of your video. Using a custom thumbnail, however, can increase your play rate by 34%.
Your thumbnail should be something to consider before you put your video out into the wild. Each video's thumbnail is either encouraging or discouraging engagement from your audience. If you have a person in your video, choose a thumbnail that features the face of an actor. A smiling, friendly looking person will encourage a viewer to click play and see what the video is all about.
2) Show Off Your Brand’s Colors
Your brand's look and feel is crucial to brand recognition. You wouldn't want your video player to stand out in the wrong way. Adjusting your player color will bring your website or email together in a cohesive and branded way. We've found that choosing a custom player color that represents your brand increases your video's play rate by a full 19%.
You can choose to use a color that is the same as the elements on your website, landing page, or email to bring the content together and make it look more professional, influencing a higher percentage of your audience to click play and ultimately convert.
3) Keep It Short
You've probably heard it a million times -- in today's age, humans have short attention spans. We're bombarded with content, and much of that content is in video form. In order to keep your audience's engagement strong and convince them to convert, your video should stay within a certain time frame.
We've recently pulled some numbers around video length and engagement, and unsurprisingly, two minutes is the ultimate cutoff. Videos that are up to one minute long have an average 70% play rate -- that's huge! For one minute, 70% of your audience is engaged, willing to stick around and learn more about the content in your video. Once your video gets just over two minutes, however, you're in hot water. Engagement drops by 5% at two minutes, and starts to freefall after that.
These simple changes can really make a difference in your play rate, engagement rate, and ultimately, your conversion rate. Just changing your video's thumbnail and player color can increase your play rate by 53%, making it that much more likely that your audience will convert or follow your CTA. Keeping your video under two minutes long will hold your engagement rate right where you want it -- above 65%. These simple actions have a huge impact, and there's so much more you can do to increase your video's conversion rates. Let's look into some of the more in-depth ways where conversion is the main attraction.
Boosting Your Conversion Rate
Whether your call to action is asking someone to sign up to your email list and become a lead, to register for a webinar, to come to a physical event, or maybe to simply buy your product -- your call to action is what makes the conversion. There are many different ways to include a call to action in your video. There are several different options for how to include video CTA beyond just changing the text or color -- consider your video's goal before choosing a type
4) Leverage CTAs and Annotations
When considering where to put your call to action in a video, whether it be an annotation or a lead generation form, think past the usual places. CTAs are most often put at the end of videos, but we've found that CTAs in the middle of the video perform way better, with conversion rates at 16.95%, as compared to 10.98% at the end.
You can make your CTA engaging in the middle of your video by pointing it out in your script. Script around the CTA and weave them together to create an interesting viewer experience that will make folks excited to click. Your CTA should be very clear and have a very specific goal. You can then measure how your CTA does depending on how you weave it into your video. The more custom and clear it is, the better it will convert your viewers.
5) Put the Turnstile Where It Counts
A turnstile is basically a lead generation form. Using a turnstile in your video allows you to capture your audience member's email address by pulling up a form in the beginning, middle, or end of your video. Where you put this turnstile really matters, and the conversion rate differs depending on where in your video the turnstile appears.
Many video marketers choose to put their turnstile in the beginning or the end of the video, so it does not interrupt the viewer's experience. However, we've found that the highest converting position for a turnstile is actually in the middle of the video, with a conversion rate of 22.17%, over a 3.05% or a 8.49% conversion rate for post and pre-roll turnstiles, respectively.
Adding your turnstile to the middle of your video may seem tricky -- doesn't interrupting the viewing experience leave your audience with a bad taste in their mouth? You can incorporate a mid-roll turnstile without making the viewer feel cheated. Add your turnstile into your script in order to work around the lead generation form. Creating a script that flows around the turnstile and warns viewers that it's coming up prepares them for what's next. Try something like "Interested? Enter your email address and let's get in a little deeper", or "Enter your email for more information.
After the Video
Phew! You've gone through the whole process. You've created a custom thumbnail, added your custom player color to match your brand, and made sure your video doesn't go above the two minute mark. You've even woven in a CTA and/or turnstile into your video's script to make it flawless and engaging. You're set up for success–but what now?
6) Leverage Post-Production Analytics
Make sure you're tracking your video's analytics. It's important to keep in mind where folks watched and re-watched your video. Was there a bump in re-watches at a certain point mid-video? That may mean that folks are especially interested in what was conveyed at that time, meaning you have an opportunity to create another video specifically focusing on that topic. Re-watches help you figure out where your audience's interest was piqued, letting you create more relevant content for them in the future.
See how many folks converted on your turnstile and CTAs. You can take that data and test future videos depending on what you've done in the past. Each piece of data counts when making a high-converting, high impact video.
7) Invest In Videos For Lead Nurturing
Once your viewer has converted, you want to take them one step further in the process. Videos can be perfect for nurturing leads that have already raised their hand for your content. Making a short video that welcomes folks who have converted on partnership content, for example, can delight your audience and act as a great reminder of your company and the problems you solve. We do this after large lead generation campaigns, and especially after co-marketing projects.
When it comes to onboarding lead nurturing campaigns, video is a great asset in boosting your click through rates, increasing the probability of your audience taking the action you want them to take. You can easily tweak your onboarding workflow to reap the rewards video creates! For example, we've found that using a video thumbnail with a play button in an email, instead of a plain image, resulted in a 300% lift in our CTRs! You can't beat those numbers.
Your onboarding lead nurturing emails should have a goal, and video can help you test that goal. Our onboarding emails, for example, contain a video thumbnail that links new Wistia users to a video that walks them through uploading a new video to their account. We've found that 48% of users who start watching the uploading video actually do upload their video—this is huge! Without that video thumbnail in our onboarding workflow, we'd have missed a huge opportunity to get folks to engage more with the product.
8) Focus On the Close
Of course, once you've converted and nurtured a lead, you want to focus on the close. If your final goal is to get your leads to become customers, using video can help you get your close rates up. Specifically, try making videos that are personal and human, creating a relationship with your potential customer. Sending one-on-one videos to prospects introducing yourself and letting them know that you value their business will help create trust, and may just raise your chances of sealing the deal.
Marketing agency Bluleadz does a great job pioneering one-on-videos in the close stage of their prospective customer's journey. They send out a video when the prospect has already talked to sales in-depth and is in decision mode. Their videos look something like this:
These one-on-one videos help create the human element behind Bluleadz business -- and they work! Bluleadz has found that prospects who receive these videos before a purchase decision close at a rate of 63%, as compared to 46% for prospects who do not receive videos. That's a big difference!
With all these tips, it's time to put your videos to work! How do you make videos that convert? Let us know in the comments!
via HubSpot Marketing Blog http://bitly.com/2bvkoGk
17 Hidden YouTube Hacks, Tips & Features You'll Want to Know About
When people talk about today's most popular social sharing websites, YouTube often gets left out of the conversation in favor of sites like Facebook and Twitter.
But don't be fooled: YouTube has a lot going for it. Although Facebook might be the largest social networking site, YouTube has the second greatest reach after Facebook in terms of general usage. It's also the second biggest search engine behind its parent company, Google.
And there are a ton of cool things you can do with YouTube that you might not know about, whether you use YouTube to watch videos, post them, or both. For example, did you know that YouTube automatically creates a written transcript for your videos -- and that polishing them can help you get your videos found more easily in search? Or that you can use YouTube to easily create a photo slideshow, and even set it to music using their royalty-free audio library?
Mind-blowing stuff, people. To help you make the most out of the still very popular platform, we've put together a list of 17 of the lesser-known hacks, tips, and features YouTube has to offer.
17 Hidden YouTube Features, Tips & Hacks You'll Want to Know About
1) You can create a link that starts a YouTube video at a certain time.
Ever wanted to send someone a YouTube video, but point them to a specific moment? Let's say, for example, that you're trying to recruit your friends to learn the dance in LMFAO's "Party Rock Anthem" music video with you.
Instead of sending your friends the general YouTube link and instructing them to fast-forward to the 3:39 minute mark, you can actually send them a specific link that starts the video at whatever time you choose. Click here to see what I mean. I'll wait.
Back? Alright, here's how to do it.
To create a link that starts a YouTube video at a certain time: Open up the video and click "Share" underneath the video title. Then, under the first tab (also labeled "Share"), check the box next to "Start at:" and type in the time (in hours:minutes:seconds) you want. Alternatively, you can pause the video at the time you want it to start and that field will autofill.
After a few moments, you'll see a tag add itself to the end of the generic YouTube link (in this case, ?t=3m39s). Simply copy that link and paste it wherever you'd like.
Alas, you can't embed a video so it starts at a certain time; you can't only link to it.
2) You can easily see the written transcripts of people's videos.
Did you know that YouTube automatically generates a written transcript for every single video uploaded to its website? That's right -- and anyone has access to that transcript, unless the user manually hides it from viewers.
I can think of a number of different situations where video transcripts can come in handy. For example, maybe you want to write down a quote from a video, but the tedium of pausing-and-typing, pausing-and-typing would drive you up a wall. Or perhaps you need to find a specific section of a video, but don't want to rewatch the whole thing to find it. With a transcript in hand, you can find information like this without doing it all by hand.
To see a video's transcript: Open the video in YouTube and press the "More" tab underneath the video title. Choose "Transcript" from the dropdown menu.
(If you aren't seeing this option, it's because the user chose to hide the transcript.)
The transcript will appear as a new module in the same window. In many cases, the user who uploaded the video will not have gone back and manually polished the transcript, so it won't be perfect. But it'll certainly save you some time and pain.
3) You can help your video get found in search by editing or uploading a transcript.
Both YouTube and its parent company Google look at a number of factors when ranking videos in search to determine what your video is about, and your transcript is one of them. (An even bigger ranking factor is your video's description, which is why Digital Marketing Consultant Ryan Stewart suggests that you actually paste your transcript right into the description box, too.)
To add a transcript to your video: Open the video on YouTube, and you'll see a row of icons just below the play button. Click the icon on the far right for "Subtitles & CC." (CC stands for "Closed Captions.)
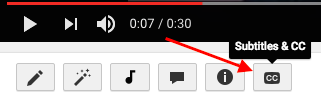
Set your language if you haven't already. Then, you'll then be prompted to choose among three different ways to add subtitles or closed captions to your video by ...
- Uploading a pre-written text transcript or a timed subtitles file. (Learn more about the file types you can upload and more here.)
- Pasting in a full transcript of the video, wherein subtitle timings will be set automatically.
- Typing them in as you watch the video.
The folks at YouTube have done some great things to make that third option (typing as you watch) as painless as possible. For example, if you check a box next to "Pause video while typing," it'll make the whole process a lot faster. Here's a GIF showing that in action:
4) You can use YouTube to easily get free transcriptions of your videos and audio files.
This is the last one about transcripts, I promise -- but I'll bet you never thought about them this way. As you know from #2, YouTube automatically adds a transcript to every video. But if you're looking for a one-off transcription of an audio or video file and don't want to pay for a service, YouTube's built-in captioning system isn't a bad place to start. You can always clean it up later.
To get an automated transcription for a video: Simply upload your video to YouTube, open it on YouTube's website, press the "More" tab underneath the video title, and choose "Transcript" from the dropdown menu. The transcript will appear as a new module in the same window. If you want to clean it up, follow the steps outlined in #3 for a user-friendly experience.
To get an automated transcription for an audio file: You'll need to upload your audio recording to YouTube using a service like TunesToTube. It'll take anywhere between 2–30 minutes for YouTube to upload it. Then, follow the instructions for getting an automated transcription for a video, outlined above.
5) You can create, share, and collaborate on video playlists.
Just like on your other favorite media sharing sites like Spotify and iTunes, you can create a "playlist" on YouTube -- which is really just a place to store and organize the videos (your own and others'). You can keep playlists private, make them public, or even share them directly with others.
Playlists are useful for a variety of different types of users, from an individual collecting cooking videos for their upcoming dinner party to a brand segmenting their YouTube video content by topic. For example, Tasty's YouTube playlists break up recipes by meal type, making it easier for people to browse and find what they're looking for:
To create a playlist on desktop: Go to your Playlists page by clicking here or clicking your account icon in the top right, choosing "Creator Studio," clicking "Video Manager" on the left, and choosing "Playlists." Then, click "New Playlist" on the top right and choose whether you'd like to keep it private or make it public.
To create a playlist on mobile: Click here for instructions explaining how to create new playlists using your iOS or Android mobile devices.
To add a video to a playlist: If you're adding a video to a playlist while you're watching it, click the "Add to" icon below the video title and check the box next to the playlist you'd like to add it to.
If you want to add a video to a playlist right from your Playlists page, simply click "Add Video" and either paste in a video URL, choose a video from your uploads, or search for a video on YouTube. Once you find the video you want to add, select the "Add to" menu from that video and add it to the playlist.
Your friends can contribute to your playlists, too. All you have to do is turn on the ability to collaborate on playlists. Once you turn it on, anyone you share a playlist link with can add videos to that playlist. (They can also remove any videos they've added, too.)
To add friends to a playlist: Go to your Playlists page again and open the playlist you want to collaborate on. Click "Playlist Settings" and choose the "Collaborate" tag. Toggle on that collaborators can add videos to the playlist, and from there, you can send them a link where they can add videos to the playlist.
Once your friend's been invited to a playlist, they'll be able to add new videos to it and remove videos they've added in the past. They just have to follow some on-screen instructions first to confirm they want to be a contributor and to save the playlist to their own account.
When you add a video to a playlist you're collaborating on, your name will appear next to the video in the playlist, and everyone who's been invited to collaborate on that playlist will get a notification that a new video has been added.
(To learn more about how to manage contributors, stop accepting contributions to a playlist, and so on, read this YouTube Support page.)
6) You can save videos to watch later.
Ever seen YouTube videos you wished you could bookmark for later? Maybe you aren't able to turn the sound on at the moment, or perhaps you just don't have time to watch it. Well, YouTube took a page out of Facebook's ... book ... by adding something very similar to Facebook's "Save for Later" feature (#2 in this blog post). On YouTube, you can save videos to a "Watch Later" playlist to access whenever you want.
The "Watch Later" playlist operates just like a normal playlist, so the instructions are identical to the previous step (except you can't invite others to collaborate on your "Watch Later" playlist).
To add a video to your "Watch Later" playlist: Open the video on YouTube and click the "Add to" icon below the video title and check the box next to the playlist you'd like to add it to, just like you did in the previous step. The steps are very similar on mobile, but click here if you want the full instructions from YouTube's Support page.
To access those videos: Simply go to your YouTube homepage and choose "Watch Later" from the menu on the left-hand side of your screen.
From there, you can watch the videos you were saving, as well as easily remove videos from that list that you've already watched.
7) You can create your own custom YouTube URL.
Want to give people an easy-to-remember web address to get to your YouTube channel? You can actually create a custom URL, which you can base on things like your display name, your YouTube username, any current vanity URLs that you have, or the name of your linked website. HubSpot's, for example, is https://www.youtube.com/hubspot.
Important Note: Before you do this, make sure you're positive this is the custom URL you want -- because once it's approved, you can't request to change it, nor can you transfer it to someone else. Keep in mind that it'll be linked to both your YouTube channel and your Google+ identity, too.
Unfortunately, not everyone's eligible for a custom URL. To get one, you have to have 100 or more subscribers, be at least 30 days old, have an uploaded photo as channel icon, and have uploaded channel art. If that sounds like you, keep readin'.
To claim your custom URL: Open up your YouTube account settings and click "Advanced" in your name section.
If you're eligible for a custom URL, you'll be prompted to claim yours by clicking a link.
Select the box next to "I agree to the Terms of Service." Then, once you're super sure it's the URL you want since you can't ever change it, click "Change URL" to make it final.
8) You can add clickable links to your videos.
Want people to not only watch your video, but engage with it, too? On YouTube, you can add clickable links YouTube calls "annotations" to your videos. These annotations work kind of like call-to-action buttons, and you can use them to link people to subscribe to your channel, to link to merchandise or a fundraising campaign, to go to another resource to learn more, and so on.
It's an easy way to encourage people to actually engage and interact with your videos. (For marketers, it might even be a way to send people back to your website.)
What do these clickable links look like? To see one in action, check out the video below. You'll see it pop up at the 10-second mark -- and if you click on it, you'll see it pauses the video and opens up a new tab in your browser for you to explore.
Pretty cool, huh? Here's how you add annotations like that to your own videos.
To add a clickable link/annotation to a video: First, make sure your YouTube account is verified and that you have external linking turned on for your account.
Once you've got that set up, open up YouTube and go to your Video Manager by clicking here or clicking "Video Manager" near the top of your YouTube home page. Then, find the video you want to add links to and click the arrow next to "Edit." Choose "Annotations" from the drop-down menu.
Click "Add Annotation" to add a new annotation, and choose from the five annotation types in the pull-down menu: Speech bubble, Note, Title, Spotlight, or Label. For this tutorial, we chose the note option. (Read this blog post to see what each of these annotations look like.)
Once you choose an annotation type, you can then add text, choose your font, size, background color, and transparency. Below the video, you can choose exact start time you want your annotations to start and end.
Here's the key part: To add a link, tick the checkbox next to "Link" and choose what type of page you'll link to, like an "Associated Website." (Pro Tip: Use tracking tokens on the URL to track how many people actually click it.)
When you're done, click "Publish" -- and you're all set. You can always edit your annotations after publishing by going back into the "Edit Annotation" tool and click "Edit existing annotation."
You can read this blog post for more thorough instructions on adding annotations to videos.
Note: Annotations appear on standard YouTube players and embedded players, but they don't appear on YouTube chromeless players, or on mobile, tablet, and TV devices.
9) YouTube has a big library of high-quality, royalty-free sound effects and music you can browse and download.
Want to add some cool sound effects or music to your YouTube video (or any video)? YouTube is there for ya. They have a whole library of high-quality, 320kbps audio tracks and sound effects that you can download royalty-free and add to your videos. (Or listen to in your free time. We won't judge.)
To add music or sound effects to your video: Open YouTube's Audio Library by clicking here or opening your Creator Studio, clicking "Create" in the menu on the left-hand side, and choosing "Audio Library."
Now, the fun begins. By default, it'll start you on the "Sound effects" tab. Here, you can search sounds using the search bar, like I did in the screenshot below for motorcycle sounds.
You can also toggle by category (everything from human voices to weather sounds) or scroll through favorites that you've starred in the past. For easy access in the future, select the star to add the track to your Favorites. The bars next to the songs show how popular a track is.
If you switch over to the "Music" bar, you can browse through all their royalty-free music. You won't find the Beatles in here, but you will find some good stuff -- like suspenseful music, uplifting music, holiday music, jazz, and more. Instead of toggling by category, you can toggle by genre, mood, instrument, duration, and so on.
(Note: Some of the music files in there may have additional attribution requirements you have to follow, but those are pretty clearly laid out on a song-by-song-basis. You can learn more on YouTube's Support page here.)
Once you've found a track you like, click the arrow to download it and it'll download directly to your computer as an MP3 file. Then, you can do whatever you want with it.
If you want to source sounds for your videos outside of YouTube, you'll just have to make sure to you're following all the rules for sourcing them. Refer to this YouTube Support page for best practices for sourcing audio, and this one to learn YouTube's music policies.
10) You can easily create photo slideshows and set them to music.
Ever wanted to make one of those cheesy photo slideshows for a birthday or a baby shower or a team party? There's no need to download software or use an unfamiliar platform -- YouTube has a special featured designed just for creating photo slideshows. And it's really easy to use.
You can upload as many photos and videos as you'd like, and choose from hundreds of movie styles, transitions, and effects to make it look awesome.
Plus, remember YouTube's Audio Library we just talked about in #9? You can totally source music or sound effects from that and add it to these videos without a hassle.
Here's how you do it. (Pro Tip: I'd recommend gathering all the photos you want into a single folder on your computer before you start making the slideshow to save time selecting them.)
To create a photo slideshow: Log in to YouTube and click the "Upload" button at the top right of your screen. Normally, this is where you'd upload a pre-existing video -- but instead, you'll want to find the "Create Videos" module on the right-hand side of your screen. Find "Photo slideshow" in that module and click "Create".
At this point, you'll be able to choose your photos -- either ones you've already uploaded to Google+, or photos on your computer. If you followed my advice above and created a folder for the photos you want, then choose the tab "Upload Photos" and add the folder either by searching for it manually, or by dragging-and-dropping like I did below.
From there, you'll be able to rearrange the photos and add more photos if you'd like.
Press "Next" on the bottom right, and it'll open up the video preview, where YouTube has created the transitions for you based on what's most popular. The default option actually looks pretty good -- but you can always change the slide duration, the slide effect, and the transition. You can still press "Back" if you decide you want to rearrange the photos or add more.
On the right, you'll see a list of suggested the top ad-free songs from the audio library. Pick from this list, search the library for different ones, or check the box next to "No Audio" to keep it silent.
When you're all set, click "Upload" on the bottom right and wait for the video to process. This could take a few minutes. While you're waiting, you can fill out the description, add tags, choose to make it public or private, add it to a playlist, and so on.
Here's the end result of mine, which took me a total of maybe three minutes after choosing the photos:
11) You can live stream videos to YouTube.
Live streaming video has been a big topic of conversation for the past few years. It's seen massive growth, especially in the past few years with the advent of Twitter's Periscope and the recent Facebook Live phenomenon.
YouTube's been ahead of the curve, offering a live streaming option on desktop for the last few years -- but in June 2016, they finally added the ability for people to live stream from their mobile devices, directly from within the app. Unfortunately, the live mobile video streaming is only open to a select few right now, and all we know about timing is that they'll start opening it to more users "soon."
Live streaming on YouTube is a little more complex (and confusing) than than live streaming using Facebook Live, though. On YouTube's easier streaming option, there's no simple "start" button; instead, you actually have to download encoding software and set it up to use live streaming at all. Luckily, YouTube has easy-to-follow instructions for how to do just that.
If you're streaming a live event, though, all you need is a webcam. We'll get to that in a second.
To live stream from your desktop computer: Log in to YouTube and click the "Upload" button at the top right of your screen. Normally, this is where you'd upload a pre-existing video -- but instead, you'll want to find the "Live Streaming" module on the right-hand side of your screen. Click "Get Started" in that module.
Before you go live, YouTube will first confirm that your channel is verified and that you have no live stream restrictions in the last 90 days. Once that's all set, you have two options for streaming: "Stream now" and "Live Events."
Stream Now
Stream Now is the simpler, quicker option for live streaming, which is why it's YouTube's default for live streaming. You'll see a fancy dashboard like the one below. (Note that live streaming is still in beta as of this posting, so your dashboard may look different from mine.)
Again, you'll notice there's no "start" button on the dashboard. This is where you'll need to open your encoder and start and stop your streaming from there. Here's YouTube's Live Streaming FAQ page for more detailed information.
Live Events
Live Events gives you a lot more control over the live stream. You can preview it before it goes live, it'll give you backup redundancy streams, and you can start and stop the stream when you want.
Choose "Live Events" from your live streaming dashboard once you've enabled it. Here's what the events dashboard looks like, and you can learn more about it here.
When you stop streaming, we’ll automatically upload an archive of your live stream to your channel. Note that your completed live stream videos are automatically made public on your channel by default as soon as you're done recording. To make them disappear from the public eye once you're done, you can select “Make archive private when complete” in the "Stream Options" section of your live dashboard.
Want to see what live videos others are recording on YouTube? You can browse popular YouTube videos that are live right now by clicking here.
12) You can upload and watch 360-degree videos (live and pre-recorded).
YouTube first announced their support for 360-degree videos back in March 2015, and it was a total novelty -- not to mention a game changer. Since then, brands, athletes, and other users have created some awesome 360-degree content, like this video from Samsung:
As you can see, the experience as a viewer is really, really cool. On desktop, you can click around the video to see all the different angles while the video plays. On mobile, it's even cooler: You can move your camera around to change the angle. You can browse the trending 360-degree videos here.
To actually create a 360-degree video on YouTube yourself, though, you need some serious equipment. Cameras with 360-degree capability that are compatible with YouTube are listed here on YouTube's Support page, along with how to create and upload a 360-degree video file.
What about live video in 360 degrees? That announcement would come a year after the first one, in April 2016 -- the very same week Facebook announced its own design for a 360-degree camera. Luckily for the folks at YouTube, they beat out Facebook by supporting both live video and 360-degree footage all at once.
The Verge called 360 live streamed videos "the gateway drug to virtual reality" for YouTube. Without a hefty price tag (without any price tag, for that matter, other than the time it takes to watch the ads we're already used to seeing, I have to agree. Other than the YouTube website or app, you don't need any fancy equipment to be able to watch a 360-degree live video and feel like you're basically there. Keep an eye on this.
13) YouTube ads target you based on an algorithm similar to Google and Facebook.
We've written about how Google's algorithm works, as well as how the algorithms work on Facebook, Twitter, and Instagram. But what about YouTube? How does it decide which ads play on the videos you watch?
Turns out it works a lot like Google and Facebook ads do. Like on other free sites, the advertisers help fund the YouTube experience in return for exposure to their ads. You'll see certain ads over others because of your demographic groups, your interests (which is judged in part by what you search on Google and YouTube) and the content you've viewed before, including whether or not you've interacted with the advertiser's videos, ads, or YouTube channel.
YouTube’s algorithms also try to make sure that people aren’t overloaded with ads while watching their videos -- so they actually sometimes don't know ads on monetizable videos, even when there's a demographic match.
Here are the five ad formats you can expect to see on YouTube, and how they work:
a) Display ads, which show up next to the video and only appear only on desktop and laptop computers. The advertiser gets paid when you see or click on the ad, depending on their selection.
Image Credit: YouTube's Creator Academy
b) Overlay ads, which appear across the bottom 20% of the video window and currently only appears only on desktop and laptop computers. You can X out of the ad at any time.
Image Credit: YouTube's Creator Academy
c) TrueView in-stream, skippable video ads, which are most common ads. These are the ones you can skip after watching for five seconds. Advertisers can put it before, during (yikes!), or after the video plays, and they get paid only if you watch at least 30 second of the clip or to the end of the video ad -- whichever comes first.
Image Credit: YouTube's Creator Academy
d) Non-skippable video ads, which are those longer, 15-or-more-second ads you see before plays and can't skip after any period of time, no matter how much you shout at your screen.
Image Credit: YouTube's Creator Academy
e) Midroll ads, which are ads that are only available for videos over 15 minutes long that are spaced within the video like TV commercials. You need to watch the ad before continuing through the video. How the advertiser gets paid depends on the type of ad: If the midroll is a TrueView ad, then you'd have to watch 30 seconds of the end or the entire ad -- whichever is shorter. If it's a CPM-based ad, then you have to watch the entire ad no matter how long it is.
Image Credit: YouTube's Creator Academy
14) You can remove ads from YouTube videos (and watch videos offline) for 10 bucks a month.
Video ads are the reason you can watch videos for free on YouTube. It's a fact many of us have come to accept. But with YouTube's subscription service YouTube Red, that doesn't necessarily have to be true anymore.
For $9.99 a month, you can watch YouTube videos ... without any ads. And, in addition to ad-free videos, you can save videos on your mobile device and watch them in the background and/or offline, and you can use YouTube's Music App (on iOS and Android) in the background, offline, and/or on audio mode. This is not a drill.
You'd think the lure of ad-free videos would have caused more of an uproar since its launch in late 2015, especially given YouTube's domination in the music space. Surprisingly, I haven't heard much noise about it. But YouTube hasn't disclosed subscriber numbers, so it's hard to tell how well it's doing. Either way, it's good to know about -- especially if you like collecting songs and music videos like I do, but don't like when they get broken up by ads.
15) You can use Google Trends to explore and compare popular YouTube search terms over time.
You might already use Google Trends to look at the popularity of specific search terms over time. (It can be a great marketing tool for making smarter keyword choices, for instance.) But did you know you can use it to compare the popularity of YouTube search queries, specifically?
All you have to do is open Google Trends and type a search term into the "Explore topics" search bar at the top. Once that page opens up, click on "Web Search" to open a dropdown menu, and choose "YouTube Search" so it filters by YouTube searches specifically.
You might find that, for some search terms, the search trends are very different on Google (above) than on YouTube (below).
16) There's a "safer" version of YouTube available for your kids.
Any parent will tell you how scary it is for their kids to theoretically have access to everything public on the internet. But for your younger kids, there are ways to curb that access and have more control of what they're watching and finding -- including a kids' version of YouTube called YouTube Kids.
The folks at YouTube call YouTube Kids "a safer version of YouTube." It's not a wide-open library of online videos like YouTube is; instead, it uses filters powered by algorithms to select videos from YouTube that are safe for kids to watch. It's also totally free, thanks to ads (which are regulated as carefully as possible).
You can either turn the search feature on or off, depending whether you're cool with your kids searching for videos themselves, or if you'd rather they're limited to a certain set of videos selected by the app, along with those the app recommends based on what they’ve watched already. You can set a timer to limit how much time a child spends on the app, which I imagine is music to many parents' ears.
The algorithm is darn good -- remember, Google is YouTube's parent company -- but, as they warn in their parent's guide, "no algorithm is perfect."
17) You can learn about YouTube's copyrights terms from a cast of ridiculous puppets.
Made it this far? Here's a little reward: YouTube's "Copyrights Basics" FAQ page, which is, fittingly a YouTube video -- and features a pretty colorful cast of characters. It's actually super informative, and it looks like their video team had a lot of fun making it.
My favorite line is probably, "You know there are links on this webpage, right? You don't have to watch this." Although the chorus of gorilla puppets was pretty great, too.
Enjoy.
We hope we've opened your eyes to some of the more awesome YouTube hacks, tips, and features out there that you may not have known about. Now log on to YouTube and do some exploring yourself. The platform certainly isn't going anywhere.
Which YouTube features can you add to the list? Share with us in the comments below.
via HubSpot Marketing Blog http://bitly.com/2c8DvYd